Hello to everyone of my blog readers. Sorry of the new tutor late for some my problems. So i have to came back and read continuously adobe blog.
Here comes a new tutor of about the logo many of new user have to search on the internet how to create logos so i have to write the new tutor of creating logo from scratch professional logo in adobe photoshop cs3.
First of all see the final of our logo adjusting idea in your mind what we creating.
 Start creating new canvas by (400x200px) with 72dpi dimension fill it black color by choose black color of color swatch in the toolbar then alt backspace to fill black in canvas.
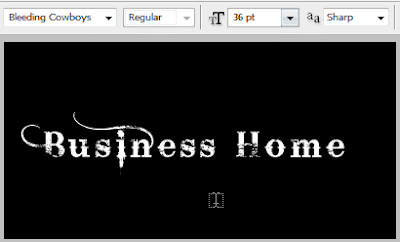
Then in the toolbar of the left side choose the Horizontal Type Tool (T) in its option bar top of the interface of the adobe choose first drop down box select the font like mine ( Bleeding Cowboys) and setting up like the image below enter the text Business Home.
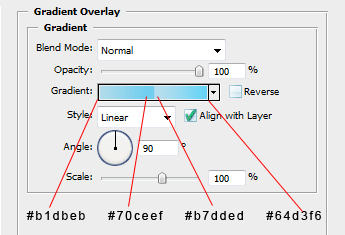
 Next i want to apply it to some layer style for this i double click on the text layer in layer palette for access the layer style box in the appear box select Gradient Overlay in the left side of the dialog box for Gradient Overlay setting access click it name the center area will change to Gradient overly setting options. Click gradient slider to access gradient editor choose these color setting in the bottom picture.
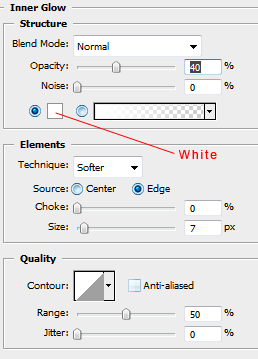
 Make sure you does not close the layer style box if close repeat the steps previously to access its dialog box then in the left side of the box choose Inner Glow and setting its color to white and setting other option like the picture below.
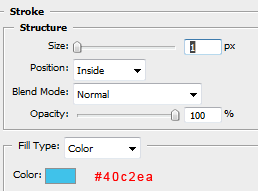
 One more effect is to apply our text layer is Stroke apply it and setting up like the image shown below make sure if you have to follow along me to copy every thing like mine.
 After we apply the layer style apply on our text layer the final of here. Here our logo take shape.
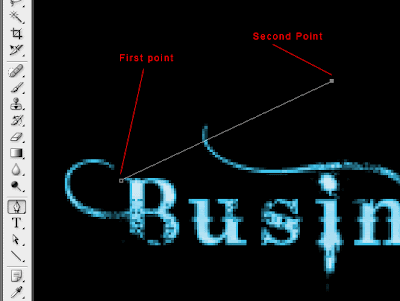
 Now its time to create a three circles of our logo how to create it we create it with the help of pen tool in the toolbar select the pen tool on the toolbar in the option bar make sure path is selected not the shape layer. Then click once in the top left side of the word (B) and the second point of exact about the letter (I) but high like the image show you below.
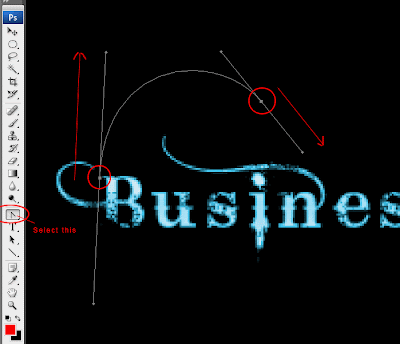
 The tricky part is coming to shape up the circle in this purposes we have to use the tool of adobe ( Convert Point Tool ) like shown below first select it then not these step carefully.
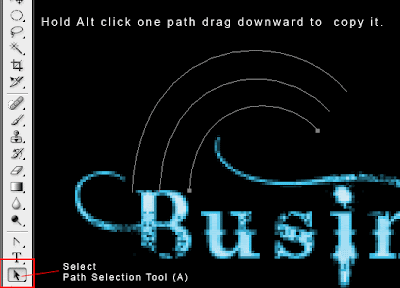
 Now we have to needed two more paths. Select the Path Selection Tool (A) hold down the Alt key on the keyboard and clicking the path but don't release the mouse left click drag it to little right and down to copy the path repeat this step to make another copy of it.
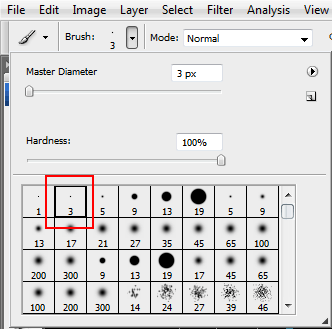
 Now we apply the stroke of it by clicking the Brush tool in the toolbar choose little brush like shown below.
 Once more time select the Path Selection Tool (A) clicking any where on the canvas to deselect the path selection then right click on the path and choose Stroke Path... Like shown below.
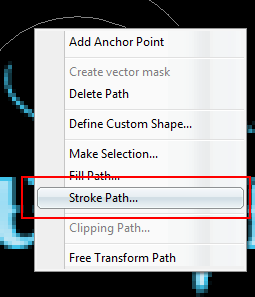 In the Stroke Path Dialog box choose the Brush in the drop down list click Simulate Pressure.
s
 After applying the Stroke path our shape lookes like this if not duplicate your layer two time and merge them by (Ctrl + E) .
 Now apply layer style two our shape first double clicking shape layer or our logo then choose color overlay in the layer dialog box and setting like this image below.
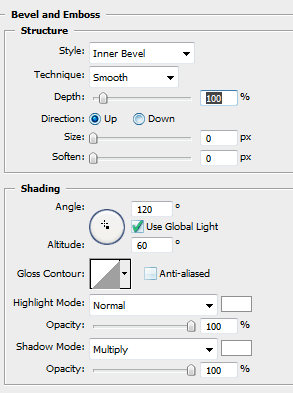
 Apply also Bevel and Emboss to it copy all setting in this picture.
 After applying the Mirror Effect our final Logo looks like this if this is difficult for you read my first logo tutor Simple Logo In Adobe.

read more "Business Home Logo In Adobe"
Here comes a new tutor of about the logo many of new user have to search on the internet how to create logos so i have to write the new tutor of creating logo from scratch professional logo in adobe photoshop cs3.
First of all see the final of our logo adjusting idea in your mind what we creating.
 Start creating new canvas by (400x200px) with 72dpi dimension fill it black color by choose black color of color swatch in the toolbar then alt backspace to fill black in canvas.
Then in the toolbar of the left side choose the Horizontal Type Tool (T) in its option bar top of the interface of the adobe choose first drop down box select the font like mine ( Bleeding Cowboys) and setting up like the image below enter the text Business Home.
 Next i want to apply it to some layer style for this i double click on the text layer in layer palette for access the layer style box in the appear box select Gradient Overlay in the left side of the dialog box for Gradient Overlay setting access click it name the center area will change to Gradient overly setting options. Click gradient slider to access gradient editor choose these color setting in the bottom picture.
 Make sure you does not close the layer style box if close repeat the steps previously to access its dialog box then in the left side of the box choose Inner Glow and setting its color to white and setting other option like the picture below.
 One more effect is to apply our text layer is Stroke apply it and setting up like the image shown below make sure if you have to follow along me to copy every thing like mine.
 After we apply the layer style apply on our text layer the final of here. Here our logo take shape.
 Now its time to create a three circles of our logo how to create it we create it with the help of pen tool in the toolbar select the pen tool on the toolbar in the option bar make sure path is selected not the shape layer. Then click once in the top left side of the word (B) and the second point of exact about the letter (I) but high like the image show you below.
 The tricky part is coming to shape up the circle in this purposes we have to use the tool of adobe ( Convert Point Tool ) like shown below first select it then not these step carefully.
1. First click on first point but don't release the mouse click drag it upward like shown below to curve our path.
2. Second Clicking the second point don't release the mouse click once more time but this time not upward this time we downward and some right side to make our shape.
 Now we have to needed two more paths. Select the Path Selection Tool (A) hold down the Alt key on the keyboard and clicking the path but don't release the mouse left click drag it to little right and down to copy the path repeat this step to make another copy of it.
 Now we apply the stroke of it by clicking the Brush tool in the toolbar choose little brush like shown below.
 Once more time select the Path Selection Tool (A) clicking any where on the canvas to deselect the path selection then right click on the path and choose Stroke Path... Like shown below.
 In the Stroke Path Dialog box choose the Brush in the drop down list click Simulate Pressure.
s
 After applying the Stroke path our shape lookes like this if not duplicate your layer two time and merge them by (Ctrl + E) .
 Now apply layer style two our shape first double clicking shape layer or our logo then choose color overlay in the layer dialog box and setting like this image below.
 Apply also Bevel and Emboss to it copy all setting in this picture.
 After applying the Mirror Effect our final Logo looks like this if this is difficult for you read my first logo tutor Simple Logo In Adobe.
