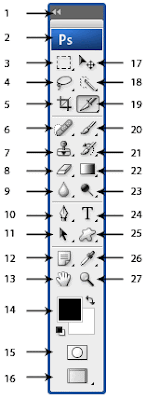
RSS

Beautiful Photo Effect

0 comments
ok today i will learn how to create a photo effect like diffused low opacity mix photo. Here is the Final Result of the effect of the photo diffuse effect behind the image.

See Final Result After Complete the tutorial.


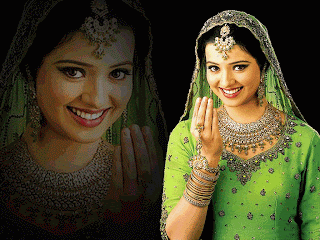
1. First open the image below to cut out the background and copy the image and create the new canvas like (1024x768) with black fill it.
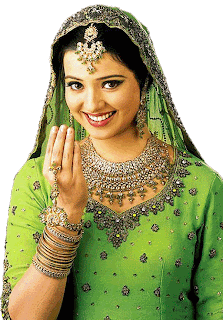
2. Second draw the oval with Elliptical marque tool like shown below in the menu go to the menu of Select> Modify > Feather (Ctrl + Alt + D) and paste the copy image setp 1 (into ) the selected marque go to the edit> Paste Into (Ctrl + Shift + V).

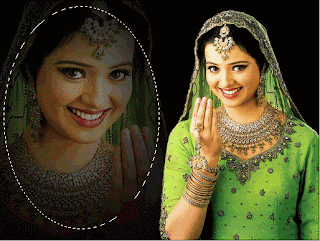
3. In the Finalized Effect shown Below with Some Resize with (Ctrl + T) what ever frame you like you want it .
If any one have any problem of this effect ask me with comments
read more "Beautiful Photo Effect"

Beautiful Web Glossy Button

1 comments
How to Create Web Glossy Button in Advance level. I will Show you the Step and Screen Shoot of the Glossy effect Here is the Final Image. It is only newer version of adobe photo shop cs3 please first double clicking the icon of the adobe to run it then get started to learn.


1. First Create a new Canvas in (200 px height) and (400 px width) fill it the black color and rounded rectangle shape tool to create a rounded box like shown below.

2. Go to the layer palette and Double Clicking the Shape layer to access the Blending mode apply the gradient like shown below.

3. In the blending option select the (Stroke) setting up like shown below.

4. In the Setting below apply the (Inner Glow).

Here is the Final Glossy Button With Text.

I Hope you enjoy this tutorial creating the web glossy button
read more "Beautiful Web Glossy Button"

Masking Layer

0 comments
In this example of the masking layer tut i will be teach you how to hide the required area of the picture but dose not delete it. Lets Start It.

1. Open up the image in the adobe sample folder where you install adobe.
2. In the open sample folder select the (ducky.tif) and click open.
3. when open the image in your canvas double click the background icon in the layer palette.
It will be remove the locked icon attached it.
4. Create a new layer and fill the color what ever you like and send back to the image order
to stay behind the image of (ducky) look something like this shown below.


5. Select the ducky image layer and click below the layer palette mask icon to add layer mask
it should look something like this.


6. It is by default reveal all mode mean all area of the image is show it is used only two color to
show or hide areas black area in the mask layer will be hidden and white area of the layer will
not hidden.
7. In the layer palette by default layer mask is selected by indicating the white box around it in layer palette.
8. Now on your keyboard hit (Ctrl + A) to select all the mask and select the rectangle marquee
tool hold down the (Alt) and in the selected area of ducky select some area like shown below.


9. Hit the delete key or fill black to hide the area we selected.

Short Cut Tips

1. Hold down the Shift and clicking the layer mask layer to disable the layer mask and show the cross of it in red color re clicking to it to normal again.
2. Hold down the Alt and once again to clicking the layer to show up the actual mask it self to re clicking the mask to back to normal again.

Little Tip Apply Filter To Mask Layer
In the layer palette and the layer mask layer image (Ducky) in between these two layer a little lock chain click it first and then select the mask. Now go to Filter> Brush Strokes> Sprayed Strokes play it like different effect in mine Sprayed Strokes Stroke Length (12) Spray Radius (7) Stroke Direction to (Right Diagonal). Shown Below for mine.

read more "Masking Layer"

Text Reflection Effect

0 comments
In this tut guys i have to teach you how to creating a text reflect effect in adobe photoshop cs3 very step by step tut so lets start to learn.

1. Create a Black canvas like (400x150).
2. Fill the Background With Black and Click the
Type Tool (T) and Click the Canvas type the
(Begin Learn PhotoShop).

3. I have to Choose the font to arial and font size to (30pt) and color to white.
4. Now to effect the reflection to text first Duplicate the text layer as shown below.

5. In the click of the duplicate the dialog is appear enter the name of the duplicate layer and
and click the ok button.

6. Now done the reflect effect on text select the Edit> Tranform>Flip Vertical and the selected
layer will be fliped.

7. Now Select the move tool (V). This will select the only layers to select the duplicate layer you
previously fliped and move it to down a little like this is mine shown below.


8. Lower down the opacity in the layer palette like shown below and the final Image Should be
looking like this.

That is all done if you like this comment it if any suggestion please tell me.
read more "Text Reflection Effect"

Creating a New Canvas and Save and Open

2 comments
Go to the Upper left corner of the adobe photo shop and click on the File> New or Short Cut key (Ctrl + N). New dialog box appear setting up the name width height resolution color mode background you wish to want from yours. But in this tut i we creating a (4x6) photo style here is the setting of the new canvas.

1. In the Name field Enter the name of the canvas.
2. In the Preset choose (Photo).
3. In the Size Choose (4x6 portrait).
4. Background Contents Choose White. and the ok to Confirm the canvase.

it is all the setting to make a new canvase. In the Canvas paint something like we i do first in tool bar select the (Brush Tool) Short Cut (B) and paint over the canvas hold down the mouse left click see as mine or you want you choose your paint.

How to Save My New Canvas
In the to left corner of the adobe click the File> Save Enter the name of your Document
Choose File Format in this case i choose photo shop (psd) format and mine save it to the Desktop.
Close the Document File> Close to Close the Canvase.


How To Open The Document We Save
In the to left corner choose File> Open the dialog appear in the adobe photoshop Choose a File name you open and the format and the location you save the previous Canvas you save. In the Lock in choose Desktop and find out the file name 4x6 photo and click to select it. In the lower of the dialog you see the picture of you created and hit open to open the canvas.

Finish up the tut of Creating a New Canvas and Save and Open.

Please comment it.
read more "Creating a New Canvas and Save and Open"

Changing Background From Single Color

2 comments
Ok first you open the picture to change the background .
here is the picture
of the mine and carefully select the background with magic wand tool or the left side of the workspace modify the selection 1px in and 1px feather then remove the background of blue color background. In the previous lesson making a background to attack the background .
The final version of the image should look like that.


The Final Image after the Background Changing.
read more "Changing Background From Single Color"

Make Background Coming To You

0 comments
1. First create a new canvas 450 x 200 like what ever size you want and pressing the (D) Button to your keyboard to reset the color to default.

2. Second step to go to Filter> Render> Cloud.


3. Third step is to go to Filter> Pixelate> Mezzotint and the dialog that is
appear Choose type drop down (Long Lines).


4. Fourth step you are again go to Filter> Blur> Radial Blur
and the setting is Amount (100%)
Blur Method (Zoom) Quality (Best).

5. Finally go to Image> Adjustments> Hue/Saturation (Ctrl+U) and Click Colorize and Adjust
the color you want to Final Image Should Look Like this.


If you like please comment it.
read more "Make Background Coming To You"

More Detail Toolbar of Adobe Cs3

0 comments
:: Marquee tool

It’s commonly used for selecting some part of opened image, that you want to cut-out, move resize or apply some filter on it. There are few types of Marquee tools: – Rectangular – Elliptical – Single Row – Single Column Rectangular and elliptical are pretty simple to use. Single-row and Single-column will select only 1 pixel wide row/column.

:: Lasso tool

Lasso tool is used for selecting the part of image, but by freehand curve. Lasso tool has under its group: – Polygonal lasso – Magnetic lasso Polygonal lasso will let you select with point-click method, one polygon can have minimum of 3 points, so you start with clicks and drag straight lines to cutout an polygon shape. Magnetic lasso is form of "lasso tool" where you by freehand curve drag the tool across the image, and the tool itself snap on borders of image where the cut should happen.

:: Crop tool

Crop tool let’s you crop the image to any size you want. You can adjust the rotation of crop, as you can also resize the crop box, when you are satisfied with chosen crop, press "enter" to apply the crop.

:: Spot Healing brush

This tool contain also: – Healing brush tool – Patch tool – Red Eye tool With Spot healing brush tool you can select some part of image and the tool will clean that part, and replace the selected part with surrounding pixels. This is good tool for cleaning human skin on pictures. Healing brush tool let’s you retouch damaged areas of image similar to spot healing, you can use pattern also for retouching. Red Eye tool gives you the tool for removing human red eyes from images with 1-click.

:: Clone Stamp tool

Clone stamp tool is similar to Healing tools, but before using it you must right-click on some area of image that you wish to use as source of copying, and then with left-click you copy the source to new destination while you hold and drag. Pattern Stamp tool under clone stamp, is used for applying defined pattern instead of selecting a source on image.

:: Eraser tool
This simple tool gives you erasing possibilities. You can choose type of brush for erasing. Eraser tools have with it also: Background eraser, Magic eraser.

:: Blur tool

When you need to blur just some parts of image, and you can’t do that with Blur filters from Filters menu you can use this simple blur tool. Works when you select desired brush and "paint" the blur on image. NOTE: higher brush size equals slower render/"paint" time. Blur tool under its icon has also: – Sharpen tool – Smudge tool Sharpen tool will sharpen any part of image that you click on; you can choose type of brush for it. Smudge tool will blur/smudge any part of image, like blur tool, but more motion-blurred…

:: Path selection

Is used for selecting/moving/transforming/resizing and deleting drawn paths on image. To view paths on image go to Layers palette and choose Paths tab, and select path under it, if there is some. Direct selection tool is for selection of one path in group of more than 1 path.

:: Pen tools

Pen tools are used for drawing freeform paths around the image. You can draw the path, Bezier lines, curves, and add our delete point’s on them.

:: Notes tool

Notes tool is used when you want to leave a note on particular part of image, for future editors/artists. There is also an Audio note where you can record a note so: Art director reviews the work, and records what to do/change on the image.

:: Hand tool

Hand tool is used when you need to navigate on image, especially when you zoom in into image, and you need to move to another location of image. It’s much faster to use this tool than to navigate via the rulers of window. NOTE: this tool is most often used tool in Photoshop. It’s very good to use shortcut for hand tool: just press space + leftclick and drag to navigate.

:: Select tool

Select tool is used to select layers on image (while holding CTRL), to transform selections or layers (press CTRL+T), or just to move or nudge by keyboards arrows selection or layer. Also it’s used to rotate, skew and mirror layers/selection.

:: Magic wand tool

Is used to select areas on image or picture that share the same tone/color range. If you wish to select all gray areas of image, just set tolerance of the tool and click on image, the tool will do the rest.

:: Slice tools

Slice tool is used to crop the flattened image on smaller parts and later on to export that smaller parts into tables for using them in webpage. To slice an image, you select the tool, drag rectangles of desired size across the image, and when you are finished, press File -> Save for web. You will get a window where you can choose type of compression for images, and some more export options. The result will be html file, with folder, where sliced images are contained.

:: Brush & Pencil tool

Brush is the tool for painting on image. You can choose various brushes, which come with Photoshop. You can also import your own brushes, and create new brushes yourself. Pencil tool is mainly for drawing pixel art. But anyway can be used when you want to draw sharp, pixel accurate lines. Color replacement tools are used for correcting color ranges. With this tool you can select one part of image, and then transfer color range of that part on some another part. Result is coloring with sources colors.

:: History brush tools

With history brush you can undo all effects of stuff you previously did, but only on brushed areas, the more you click and drag the brush, the tool goes back in history and undoes on brushed parts. Art history brush does the same but in more artistic way.

:: Gradient & Paint bucket tool

Gradient is tool for drawing gradients across the canvas. You can define your own gradients or choose among default ones. Paint bucked tool paints the whole layer (if empty) or just the tolerated part of image with foreground color.

:: Dodge, Burn, Sponge tools

Dodge tool will lighten up (by specified exposure) the brushed part of image; it’s really releasing more exposure to image. Burn tool will darken up the image (by specified exposure) brushed part of image, it’s really lowering the exposure. Sponge tool will desaturate or saturate brushed parts of image: converting it to more gray or to more colorfully.

:: Type tools

Type tool get you the text input function. You can choose font, size, color and other typographic options. Type tool consist of: – Horizontal type tool – Vertical type tool – Horizontal mask type tool – Vertical mask type tool Horizontal and Vertical mask type tool will give you marquee mask instead of regular colored font type.

:: Vector Shapes

This tool consists of: Rectangle, Rounded Rectangle, Ellipse, Polygon, Line and Custom shape tools. When you select one of these tools you draw paths with it, for later uses. Later you can fill that paths with color, gradient, or use them to convert to marquee selection, cutout the image… Custom shape let’s you choose some predefined shape paths, or append some new ones.

:: Eyedropper, Color Sampler, Measure

Eyedropper tool sets foreground color from clicked pixel on image. Color Sampler reads RGB and CMYK values of image, where you place the mouse cursor. You can click, and memorize 4 color samples to Info palette, for later reference. Measure tool will measure the distance between 2 points, their height and width and angle of line drawn. Usages are simple, click for 1st point, then drag the line, and click for 2nd point.

:: Zoom Tool

Zoom tool is used to zoom-in or zoom-out in image. NOTE: this is also one of most commonly used tools in Photoshop. It’s very good to use it’s shortcut for faster usage. Press Ctrl+Space+leftclick to zoom in or Ctrl+Space+AltGr+leftclick to zoom out.

:: Foreground & Background color

This is default foreground and background color. To change them, click on them, and choose from opened color picker. Two arrow icon replaces foreground and background colors when clicked. Small black on white rectangle sets the default colors (black and white) when clicked. NOTE: it’s important to choose foreground and background colors to use some filters, such as Clouds filter (under Filter -> Render -> Clouds).

:: Edit mode (standard or quick mask)

Edit in standard mode is default editing mode. It shows marquee selections as dotted lines that "travel" around. Edit in quick mask mode, when clicked, will show marquee selections as inverted red color mask, so everything that is colored red is not selected.

:: Screen modes

There are three screen modes in Photoshop: Standard, Fullscreen with menu and just Fullscreen. Standard is default mode. Fullscreen with menu will go to full screen where picture is using all free areas of screen to show, File menu is also there. Fullscreen will leave only default Photoshop palettes without File menu to give you more space to work.

:: Edit in ImageReady

This button will send to editing currently opened image to ImageReady, Adobe’s software for editing animated gifs and making web ready images.
read more "More Detail Toolbar of Adobe Cs3"

Toolbar Adobe PhotoShop

3 comments

1. Expand Collapse
If you click on that arrow it will expand and again clicking collapse.
Shortcut: None

2. This is just the word ps of photo shop.
Shortcut: None

3.Marquee tool
For making selections on the image. You can select the whole image (ctrl+A), certain areas, move, copy or delete them.
There are four marquee tools: rectangular, eliptical, single row and single column.
Shortcut: M

4.Lasso tool
Same purpose as the marquee tool, for making selections. You can select more complex areas with the lasso tool. You can also make selections of desired shape with this.
There are three lasso tools; lasso, polygonal and magnetic.
Shortcut: L

5.Crop tool
Useful one. Changes the size of the image. Only the wanted part of the image is selected and the image is cropped by hitting the enter key.
Shortcut: C

6.Healing brush tool
For correcting imperfections. Similar to the clone stamp tool, but the cloned area masks the area already there.
Shortcut: J

7.Clone stamp tool
For cloning one area of an image to another place.
Shortcut: S

8.Eraser tool
Simply an eraser, used to get rid of any unwanted part of an image.
Shortcut: E

9.Smudge / blur / sharpen tool
Described by their names.
The smudge tool smudges to blend images.
The blur tool blurs, can be used to take a hard edge off something.
The sharpen tool sharpens, can be used to sharpen the edges or a whole image, to make it look more crisp.
Shortcut: R

10.Pen tool
Used for making complex shapes. It's pretty hard to get hold of it. Needs a little practice.
Shortcut: P

11.Path Selection Tool
Used for selecting paths made with the pen tool. You can alter the shape made with the pen tool by using the direct selection tool.
Shortcut: A

12.Notes tool
For adding notes or audio annotations to parts of an image. Useful when you decide to return to an image later.
Shortcut: N

13.Hand tool
For moving about an image. Can be used to move your position on an image when zoomed in.
Shortcut: H

14.Color picker
For selecting a foreground and background colour.
Foreground colours are what will be used on the brush and pencil and to fill the paint bucket tool.
The background colour is used as a secondary colour. Used if you delete anything on the background layer. The foreground and background colours fade together in a gradient with the gradient tool.
Shortcut: X (Switch foreground and background colours)
Shortcut: D (Resets foreground and background colours to black and white)

15.Modes
Standard mode is generally what you will work in. Quick mask mode is a more visual way of creating slections, and adding effects to them. Unlike using the marquee tool and feathering it, then having to fill it with a colour to see what the effect will look like, the quick mask mode lets you see what it looks like as you do it.
Shortcut: Q

16.Screen modes
Simply changes view of the workspace.
Shortcut: F

17.Move tool
For moving either selections made with the marquee tool or moving whole layers.
Shortcut: V

18.Magic wand tool
Another selection tool. Specific areas of an image can be selected to move/cut, depending on the tolerance settings.
Shortcut: W

19.Slice tool
Used for slicing up images into different sections. You can save the slices as a web page, even if you have no knowledge of HTML =)
Shortcut: K

20.Brush / Pencil tool
For drawing and sketching. There are different varieties of brushes to use, all of which can have a different colour if you use the colour picker. The brush is mainly used for the background effects and the pencil for pixel art.
Shortcut: B

21.History brush tool
Allows you to undo specific parts of an image. It's Basically like using the undo button.
Shortcut: Y

22.Paint bucket / gradient tool
The paint bucket tool is used to fill large areas of an image with a colour or pattern. The gradient tool is used to apply a gradient accross an image.
Shortcut: G

23.Dodge / burn / sponge tool
For toning images. The dodge tool lightens an image, the burn tool darkens it, the sponge tool desaturates it.
Shortcut: O

24.Type tool
For adding text to images.
There are four type tools; horizontal, vertical, horizontal mask, vertical mask
Shortcut: T

25.Shape / line tool
Used for drawing lines and shapes like rectangle. ellipse, polygon etc
Shortcut: U

26.Eyedropper tool
Used for selecting exact colours from an image on the workspace.
Shortcut: I

27.Zoom tool
For zoming in and out of an image. To get fine detail on some images, zoom in.
Shortcut: Z
read more "Toolbar Adobe PhotoShop"

Interface Of The PhotoShop

0 comments
This is very first of my tutorial for beginners who want to learn adobe photo shop Cs3 from scratch so it good place to start learning adobe.
First of all thanks to the readers to read my tutorials of my blog.

Ok start to run the adobe photo shop cs3 in the start menu.

when you click the icon of the photoshop cs3 it should look something like this.

you see this picture of first run of adobe. Its center gray area of workspace left side have a toolbar and right side of the palettes have a different palettes like colors layers info and so on so on in the top of the left side is the menu bar file edit image layer window help etc. In the beneath the menu is the option bar these kind of option appear what tool you we selected.

ok thanks all again. Meets you again in the next lesson.
read more "Interface Of The PhotoShop"
Ecommerce website development